Here’s the creative idea: You’ve got a great photo you want to enlarge and print on fabric for some great wall art. (You don’t have to work in fabric, we just teach a lot of fiber artists so we like to keep them in mind.)

Here’s the problem. You go to some Internet company to have your image printed. (In this case, our student wanted to print on fabric with spoonflower.com). You go to resize the image, but the company will only let you make the image smaller, not larger.
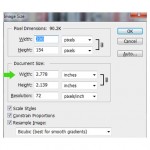
Here’s your solution: At first you think, “What gives?” Then you think you can outsmart them and resize your photo in Photoshop. You just go to Image > Image Size, make sure “constrain proportions” is checked, and change your width (see green arrow) from the original size (here 2.778″) to your desired size, say 30″.

When you go to look at your new, resized image, it looks like this.

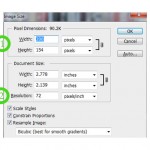
Well, click on the image, and you’ll see how pixelated it has become. Gosh, that image just won’t do, no sirree! Let’s take a look at that Image Size Dialog Box of your original image again.

1) Look at the pixel size. Remember, the pixel is the smallest element on your monitor, but you really need to know how many pixels per inch your image is.
2) So let’s look at the resolution. Ah, your image is 72 ppi (pixels per inch). I guess we just busted you. 72 ppi is the standard resolution for most web images, because images of that resolution load faster on the Internet. So, we’re thinking you found this image on the Internet and just wanted to “copy” it. (This is when we always tell our students to make sure they own the copyright of any image they print. We’ll talk about copyright-free images on another Tech Tuesday).
Here’s the moral of the story: You can’t make a purse out of a sow’s ear. Actually, we know a few artists who actually could do that, but I digress. Let’s go back to the student who thought she could simply increase the size of her image to the size she wanted. Because the resolution of her image was low (72 ppi) and the size of her image was small (app. 3″), she did not have enough pixels to work with. What in essence happens when you try and make a low-resolution image larger is that you are asking Photoshop to create pixels that weren’t there before. And, while Photoshop is a great program, it still can’t make something out of nothing.
Here’s the solution: Don’t use that Internet image. Take your own photos and check to make sure you take high resolution images, especially if you want to make a large art piece. For those of you working with on-demand fabric printing companies, they tend to like to have the images at 150 ppi at the size you want the image printed. This is a good rule of thumb. Most photographic places want images that are 300 ppi, but since fabric is a different beast, 150 ppi is quite adequate. In other words, most of the images you take with your digital camera can be enlarged quite a bit before you begin to lose sharpness. And one more thing: Aunt Betsy just emailed the cutest picture of her dog, Bruno, and you want to print that onto fabric for her birthday. Well, check out the resolution of that digital image first. Aunt Betsy may have taken the photo of Bruno in high resolution, but when she went to send it to you, her mail program automatically downsized the photo to 72ppi! If this image won’t work for you, you’ll have to call Aunt Betsy and tell her to resend the image without resizing it. We’ll hope Aunt Betsy knows how to do this!
