
We’re back with another Pixelady vs. Pixelady* post on Photoshop Elements. Today we’ll answer the burning question of whether or not to float your windows. Well, Here’s the quick answer: whichever way works for you! However, there’s one caveat, if you want to change your workspace color. Scroll to the bottom of this post to get that answer. Right now we’ll talk about docking and floating.
General Preferences
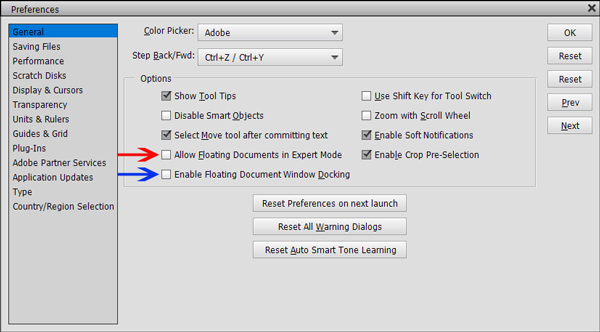
Before we start, let’s make sure everyone has the option to float their windows. From the Menu bar, click Edit > Preferences > General (Mac users = Photoshop Elements Editor > Preferences > General) to get the dialog box shown below. Check the box next to the red arrow to allow floating documents in Expert mode. Check the box next to the blue arrow, if you want to be able to dock the floating document. Now, we call ’em windows, but PSE calls ’em documents here. Same difference. Why you would want to float without later being able to dock again is a mystery to Kris, so why don’t you check both boxes for this exercise. It’s very easy to come back to this dialog box and check or uncheck one or both of these boxes to change how your windows appear.
Kris’ Way – Docked
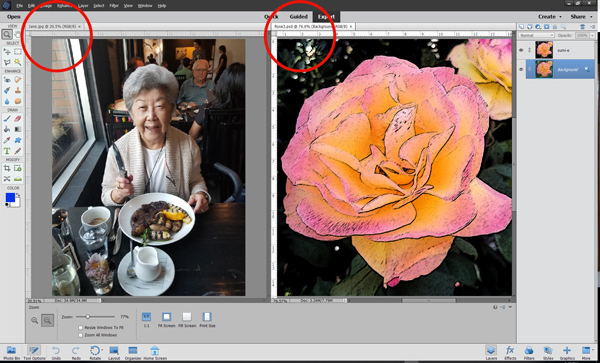
You can tell if your windows are docked because you will see light-colored tabs at the top of the workspace (red circles). Kris likes her windows docked. They’re locked in place and don’t go anywhere. When she wants to work with two images side by side, she just clicks on the Layout button at the bottom of the PSE workspace and chooses “Column.” If only one image is showing, she simply clicks on the tab of the image she wants to see. Easy, peasy.
Deb’s Way – Floating
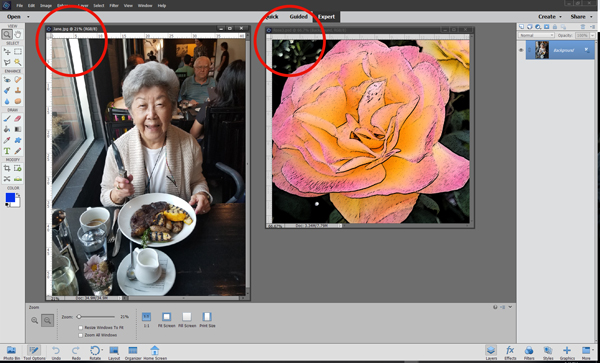
You can tell your windows are floating because the file names are not written on tabs (red circles). When it comes to Photoshop Elements, Deb is freewheeling. She likes to have her windows wherever she chooses. She’s just too busy for the darn layout button. The advantage to floating your windows is that you can make your windows any size you want by dragging on the corners of the window. Plus she can dock the windows if she really wants to by dragging a window up to toward the menu bar until a highlight bar appears. (Because she has that box next to the blue arrow checked. The one that says Enable Floating Document Window Docking.)
The Caveat – Change Your Workspace Color
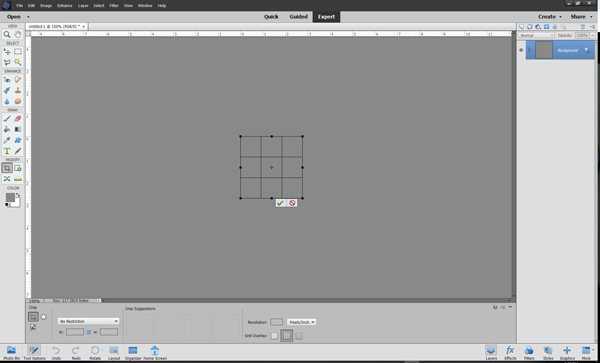
Sometimes you might want to work with a different background color. For example, if the majority of your image is gray, as in the example below, you might not even see where your image ends and the workspace begins. In this example, I engaged the Crop tool so that you can see the entire image/document. Yes, this image consists entirely of the same gray that is the workspace color!
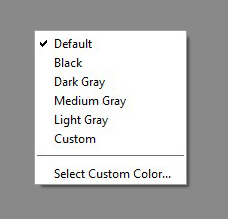
To change your workspace color, have at least one image open. Then right click anywhere on the workspace outside of the image to bring up the following dialog box. Click on any other color or “Select Custom Color” to pull up the color wheel and select a custom color:
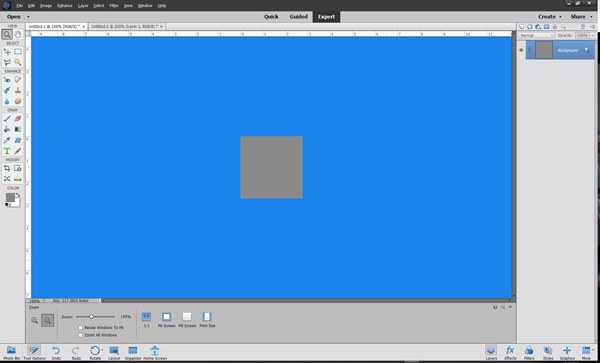
In the example below, I chose a lovely blue workspace color. Now I can clearly see my image, which is entirely gray.
Now here’s the caveat: You cannot change your workspace color, if your windows are floating! Go figure! If you think you can outsmart Photoshop (Kris certainly did!) and dock your windows, change the workspace color, and then float them again, you would be wrong (that really irked Kris!). However, once you dock your windows again, the changed workspace color will appear. If you’ve read this far, you’ll be happy to learn that it is not uncommon to accidentally change your workspace color, so knowing how to change it back is a good thing!
So do tell, do you dock or float?
* Click here to read about our inspiration for Pixelady vs. Pixelady.
4 responses to “Do You Dock Or Float Your Windows?”
[…] Believe you me, eliminating the chore of placing the images side by side makes things go lickety split! By the way, this works whether or not your windows are docked or floating. For more about docking and floating your windows, check out this blog entry. […]
[…] Reference 1 […]
[…] Reference 1 […]
[…] Reference 3 […]