
We recently had a student ask what she thought was a dumb question: “Do adjustment layers apply to all visible layers, all visible layers below the adjustment layer, all layers, or some combination thereof?” Well, here at the Pixeladies Studio we think there is no such thing as a dumb question. In fact, understanding how layers work is THE secret to mastering Photoshop. So, let’s pull this question apart and show you visually how an adjustment layer works.
Types of Adjustment Layers
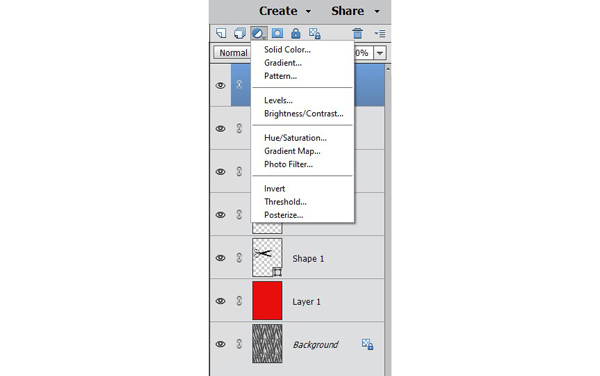
Let’s first remember that there are all kinds of adjustment layers, eleven to be exact (see image above). The adjustment layers can be found by clicking on the blue/white circle at the top of the Layers panel in Photoshop Elements. We encourage you to try them all and experiment. For our example today, we will use the hue/saturation adjustment layer.
The First Answer
An adjustment layer applies to anything below the adjustment layer that is visible. Here’s an example.
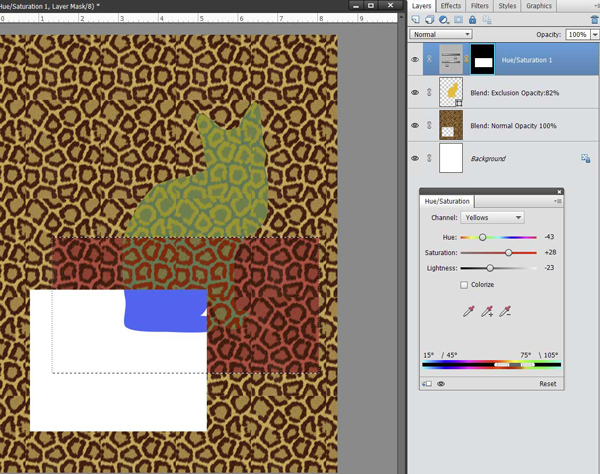
We’ve named the layers according to their blend mode and opacity. From top to bottom:
- Hue/saturation adjustment layer on a rectangular selection* (normal blend mode, opacity 100%)
- YELLOW cat shape (exclusion blend mode, opacity 82%)
- Cheetah pattern with a rectangular hole in it. Note: this is not the same rectangle as the rectangular hue/sat adjustment layer in #1 (normal blend mode, opacity 100%)
- Background layer: solid White (normal blend mode, opacity 100%)
* We’ve changed only the YELLOW channel in the the hue/sat adjustment layer. So what changes? Anything that looks yellow within the hue/saturation adjustment rectangle. The area where the rectangular hue/sat adjustment layer covers appears redder now. But what about the cat?
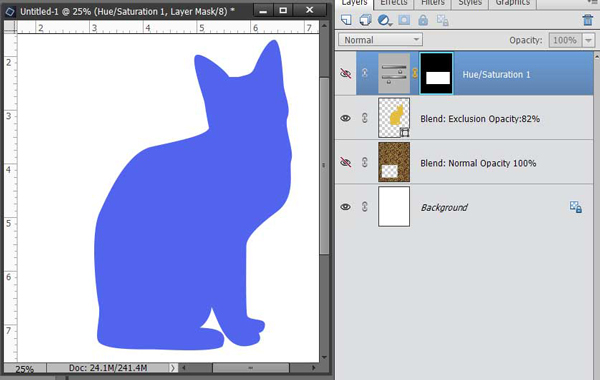
The Second Answer
Okay, but the cat is YELLOW, so why didn’t it change as well? In general, the YELLOW parts of the cat that you can see would change, but because the YELLOW cat shape layer has an exclusion blend mode on it, it’s no longer yellow, it’s blue! So the adjustment layer changes nothing on the cat. The image below shows the image with just the cat shape and the white background layer visible.
The Third Answer
Ah, but there’s another layer below the cat, the pattern. If we turn off the hue/sat adjustment layer and turn on the pattern, this is what we see:
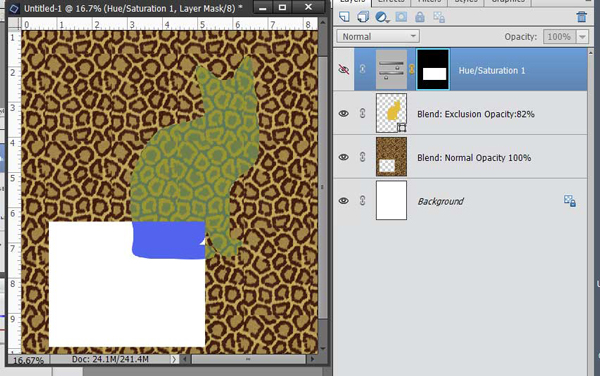
Because the cat has a blend mode other than normal and an opacity setting less than 100%, the pattern shows through the cat. What were the yellowish parts of the pattern changed to green below the cat. And the brown parts of the pattern changed to a yellow color. So what will change if we turn the adjustment layer back on? Only the yellow parts of what we see above (meaning only the brown parts of the pattern under the cat and the yellow parts of the pattern that are not under the cat). See the first image again. Those yellow areas changed to a reddish color. Again, remember the blue parts of the originally YELLOW cat don’t change because those blue parts aren’t yellow. Does that make sense? Once you get something you like and want to work on it some more, you might want to make a stamp visible layer with all the visible parts on one layer. Read our post about that here.
The Best Answer
The important thing to learn about adjustment layers is that if you don’t like what your adjustment layer does, you can always delete it! Give it a try with some photos and shapes of your own. Change the blend modes and opacity of the layers and see what changes. And just to confuse things further, you can even change the blend mode and opacity of the adjustment layer! Now you know why we encourage all of our students to pretend they’re ten-year-olds who will just push all the buttons to see what happens. We know we can always hit the Undo button!