
Don’t get me wrong, we here at Pixeladies absolutely love Adobe’s Organizer software, which so quickly and smartly helps you organize your digital images. It’s included in Photoshop Elements, so you really get two programs for the price of one. What’s nice about Organizer is that you have the flexibility to change how you organize your images. In other words, you can change your mind as you go along. Among Organizer’s best features is the ability to “tag” your photos with keywords so you can sort them with a click of your mouse.
Unfortunately, there is a glitch in the program that was just driving us to distraction! If you decide you want to change a sub-category into a category, the nifty editor won’t allow you to do so. Trust us, we’ve complained about this since version 14. Deb is even in a beta test group for Photoshop Elements, and our pleas still fall on deaf ears. So, we just decided to figure out a work-around for this. It takes more steps, but it works.
How It Should Work
Let’s take a look at our sample keyword/info panel (click on any image to enlarge it):
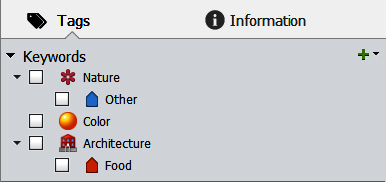
We have three categories (Nature, Color, Architecture) and two sub-categories (Nature: Other, Architecture: Food). Don’t ask me how I had Food listed under Architecture (gingerbread houses?), but I really want Food to be its own category. I know I will eventually want to divide this category into several subcategories, but I can leave that for another day. My immediate problem is that I have already tagged several photos with this keyword, so how can I go about turning this sub-category into a category?
The Glitch
It should be so easy. Here is what you should be able to do. Simply right-click on the subcategory and select “Edit.” This will open up the following dialog box:
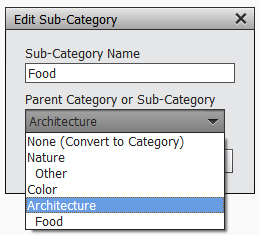
In our example, the sub-category name is “Food,” and it is currently a sub-category of Architecture. Theoretically all we have to do is click on “None (Convert to Category),” click OK, and voilà, your sub-category is now a category . . . NOT! How frustrating! And, it used to work like this all the time. Instead of screaming, which we did for a quite a while, we figured out the following.
The Work-around
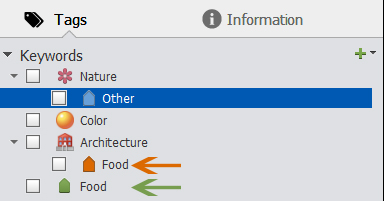
- Click on the + sign to the right side of “Keywords” and choose “New Category.” Type in the name of your new category. If you type the same word as the sub-category you already have, you will get a warning message. In our case, I just typed the word “Food” again and clicked “yes” when I got the warning. Here you can see the original Food sub-category (orange arrow) still located under Architecture and the new Food category (green arrow). Don’t let the icons fool you; they can be changed.
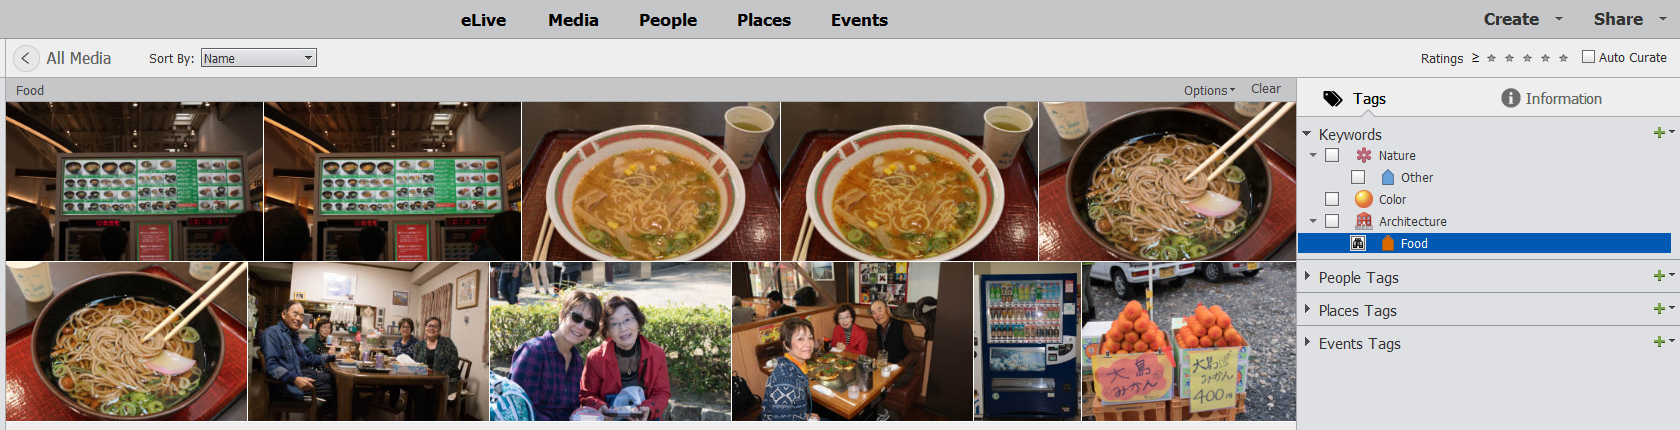
- Click on the little box to the left of your original sub-category (Food with the orange arrow) to bring up all the images you had tagged with that keyword. Yes, those are tiny binoculars in that box! You will see all your photos in the middle of the workspace.
- Select all the images by clicking on the first image, then holding down the Shift key and clicking on the last image.
- Click on the “Food” category and drag it to one of the images. You will see little tag icons flash on the images.
- To confirm that your images are now tagged with the new category, uncheck the box next to the original sub-category (Food with the orange arrow) and check the box next to the new category (Food with the green arrow) to call up all the images in that category. You should see the same images that you had in the sub-category.
Delete the Sub-category!
Now that you know that you have created a category from your original sub-category, you can delete that original sub-category. Right click on the sub-category name and choose “Delete.” The following dialog box will appear:
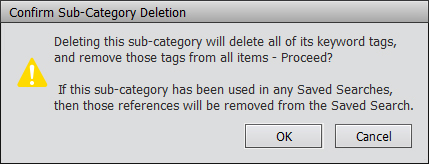
It is nice to know that Adobe really wants to make sure we know what we’re doing! Since you’ve confirmed your new category has the same images as your old sub-category, you can hit OK. In confess, I hit “Cancel” the first time and double checked before deleting. Call me cautious! Remember this step is deleting only the sub-category name, not the images you have tagged with that sub-category label.
Final Words of Advice
Don’t you think Adobe should fix this? Okay, that isn’t advice, but this glitch is so annoying. The work-around is not hard, it’s just annoying! Here are a few final things to consider:
- You can’t tell by looking (see the first image) that “Other” and “Food” are sub-categories and not keyword tags. Right click on the word. If you see “Change to keyword tag,” you have a sub-category. If you see “Change to sub-category,” you have a keyword tag. By the way, these choices work just fine.
- You must change a keyword tag into a sub-category before changing it into a category.
- You can click on any single image and see in the keyword/info panel which tags, if any, it carries. The “Image Tags” section is located near the bottom of the panel.
- Try starting out by creating only categories and keywords. By the time you’re ready to add sub-categories, Adobe may have fixed the glitch!
If you want to learn more tips and tricks for Adobe Photoshop Elements Organizer, consider enrolling in our online Organizer class. The next session starts July 9. Click here for more information and to register for class.