
This is Deb with another Tech Tuesday blog . . . just in time for those of you who still have holiday notes to write. You probably know about the custom shape tools in Photoshop Elements (PSE). And if you read our previous post on shapes, you know how to add shapes to the ones that come standard with PSE. But, did you know you can make simple pattern repeats with these shapes? Here’s how to do it:
Prepare A New File
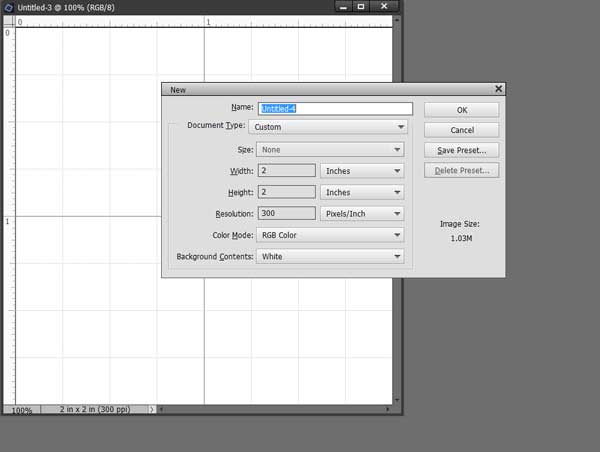
First you need to create a new blank file. For this exercise, I created a custom size of 2” x 2” with a resolution of 300 pixels per inch (ppi).
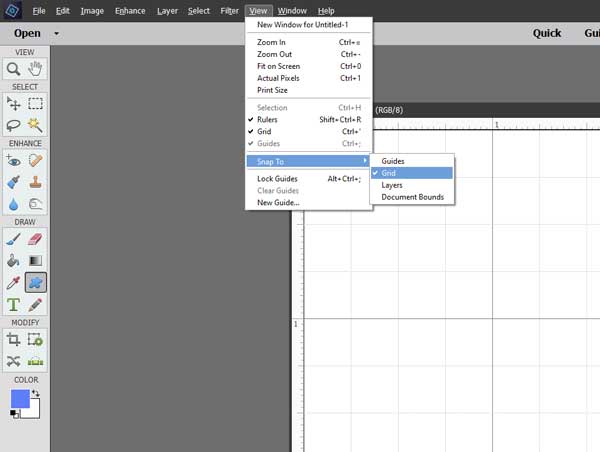
So that I could have a very symmetrical repeat, I turned on my grid (From the menu bar click on View > Grid). My grid was set to four subdivisions per inch. If you need to set your grid, go to Edit > Preferences > Guides and Grid. ( Mac = Photoshop Elements Editor > Preferences > Guides and Grid). Then I turned on Snap to Grid (View > Snap to > Grid). The check marks are toggles, so if you click on the check when it’s visible, the check disappears and turns off the grid.
Create Shapes
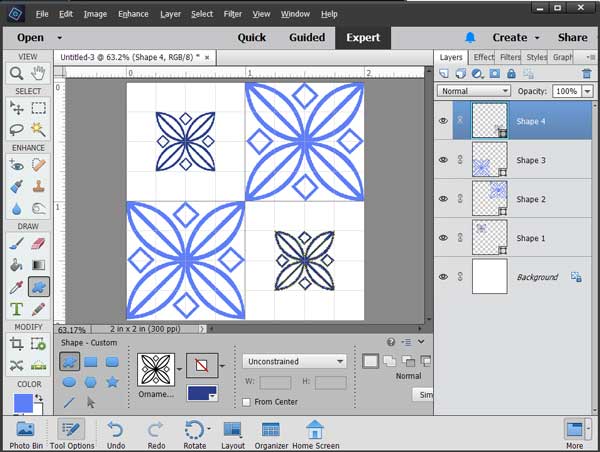
Now go to your custom shape tool and select a shape. To make the shapes centered in the one-inch squares, click near the center of the larger square, press the Alt (Mac = Option) key, and start dragging outward. The shape will “snap” to the grid marks you choose. Release the mouse first, then release the Alt or Option key. In this example, I created two larger shapes in opposite corners and two smaller shapes in the remaining corners. You’ll notice that each shape gets created in a new layer by default.
Define Pattern
When you have a design you like, you are ready to define your simple pattern repeat. From the Menu bar, click Edit > Define Pattern. Give it a name, if you want. (Like layers, Kris names hers. I don’t).
Use Pattern
You will now need a file to put the pattern on. For this exercise, I created a new letter-sized file, again at 300 ppi. Next comes the fun part. Open your Layers panel, if it’s not already open (Window > Layers). Do you see the little blue and white circle in the top line of the Layers panel? That’s the adjustment Layer icon. Click on it to open the drop-down menu and click on Pattern . . .
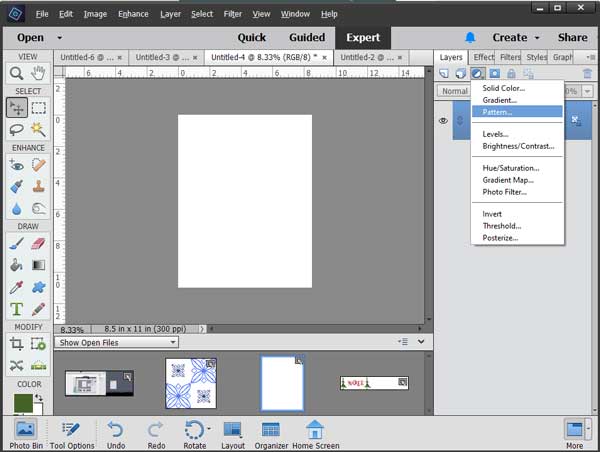
A dialog box opens, and you should see the pattern you just created in the thumbnail. If not, click on the little downward-pointing triangle next to the thumbnail and scroll to find the pattern you just created. Type in a number next to Scale or click the triangle to view the slider bar. Scroll until you like the size of your pattern.
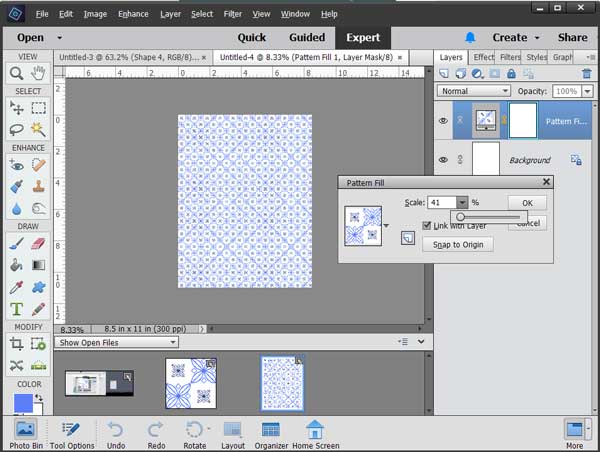
You have just created a pattern repeat. Isn’t that cool? You can adjust the size of the pattern fill by clicking on the thumbnail in the pattern fill layer. The dialog box shown above will open back up and you can change the size.
Possibilities
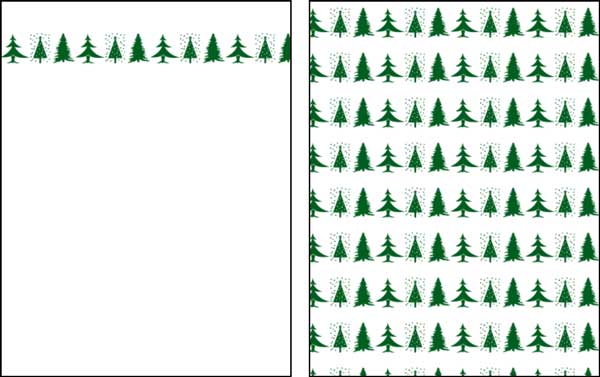
You don’t have to start with a square file for your pattern or fill an entire page. If you create a rectangular pattern like the one below, you can fill a rectangular selection with one row of trees. Just make sure you create the selection before you create the Pattern Adjustment Layer. If you don’t create a selection, you will fill the entire page (compare the images at the top of the post).

We hope you’re having a pleasant holiday season!
One response to “Create Simple Pattern Repeats With Photoshop Shapes”
Very cool. Fun thing to know.